First and Last

A while ago I have read a post from an imaginative, creative and amazing blogger Morgan over at Crab and Bee about the first thing she has ever made.

I forgot where the post is, but I kept the thought… πŸ™‚ This year I was not as crafty as I was last year, but that doesn’t mean I don’t love it anymore. Making your own clothes or accessorizes is awesome – it’s fun, it’s how you want itΒ and it’s super cheap. πŸ˜€

Fotor090420327

I was more into DIY before, I admit it. Also, I shared more of DIY ideas here on blog, and items I made. I learned how to sew which is awesome! I have no doubt that the “crafty bug” will bite me again and until then I will just enjoy in other stuff. And maybe finish the dress I was making πŸ˜€

Anyway, this on the left is the first fabric necklace I made. And the only one with the name hehe… I call it Ja Man, because of the Bob Marley on the badge. I made the badge byΒ drawing Bob Marley and gluing him on an existing badge. Then I covered the surface with transparent nail-polish and there he is, hanging on after more than a year. πŸ˜€

I wanted for this necklace to be fun and colorful and I love wearing it… It lifts up any casual combination which tend to be in neutral colors.

For the other one, it’s the last one I made so far and it was a present. I wanted to make something special and I actually struggled with this it because I kept changing how it will look as I was making it. I was not happy with version no. 1, or 2, or 3… It ended up like this and I am happy with it. More important, the person who got it is happy with it. ❀ πŸ™‚


IMG_0431


p.s. Please tell me that looks like Bob Marley! Or at least, resembles… It was so difficult to draw him small like this… πŸ™‚

IMG_1995


Do It Yourself Thursday: Big braceletes/bangles

When I started blogging I was all about DIY. Do not worry, I am still creative in that area, but I’ve become more picky when I learned how to make some stuff and so I took upon myself a few challenges which really are that – challenges. πŸ˜€

They take time and will and I have to be into the whole process to make them, so it will take a while until they end up here. So, I figured, I will share some of cool DIY ideas I find which are cute and easy, but I probably won’t have time to make them. But that doesn’t mean that you can’t. πŸ˜€

Image

Image

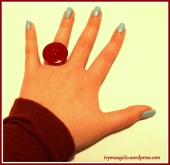
I’m lately more into easy, half-an-hour projects like button ring and earrings I posted recently. And I’m discovering my love for fashion and kinda cooking, something I was very surprised to realise, because I never gave those two more attention than necessary. But now, I enjoy more and more pairing outfits and thinking about what will go with what, going into great details. I am happy and curious how will that develops.

Have a great day! LOL (Lots of Love πŸ˜‰ )

Buttons inspired wooooo :)

Buttons inspired wooooo :)

I am listening to the song called “All I do is win” and it has a lot of woooo, so… It’s catchy hahaha πŸ˜€

I have been really button – inspired, I have a few amazing ideas (in my head) for DIY projects and it makes me happy when everything feels right for me to work on them. And then share. πŸ™‚

img_0f568

I had few of back sides to earrings and a ring with a rose glued on it from a friend who kindly gave me a bag of material for my DIYs. Thank you!
So, I removed the rose ( that was hard but I’ve promised her that I will include her in my future DIYs ) and also carefully removed the zircons from back side of earrings – I do not know how that is called.

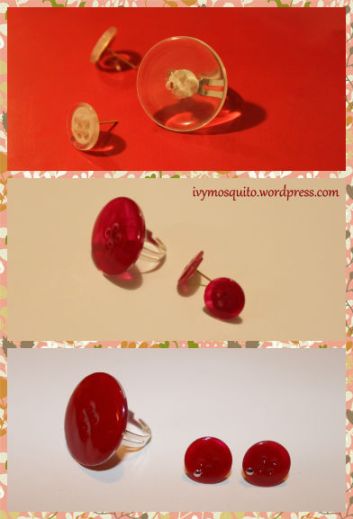
I have been searching for cute and unusual buttons around the house and now I see I will have to go shopping, since none of them match one of my project. This pair – ring and earrings was first, just to see how it will go… I wanted a red ring, really red and big. So, I found transparent button and two smaller ones, also transparent. Perfect!

Fotor0206235844

Steps are so easy…Β I glued buttons to the back, then added two layers of red nail polish. In the end I added small decorations used for nails. πŸ˜€ I love it! Not only do I have the red ring I wanted, I can remove the color when I don’t like it anymore and color the ring and/or the earrings into… I don’t know… blue! Weee… Or should I say wooooooo hahahah πŸ˜€

ifmg_0924

Have fun and enjoy yourself!

Do It Yourself: Earrings!

Do It Yourself: Earrings!

Hiya! πŸ™‚

I have started to make ideas that were piling up in my head in actual items… And gathering all the stuff I need for the pre – Christmas projects and decorations. Yaaay! πŸ˜€

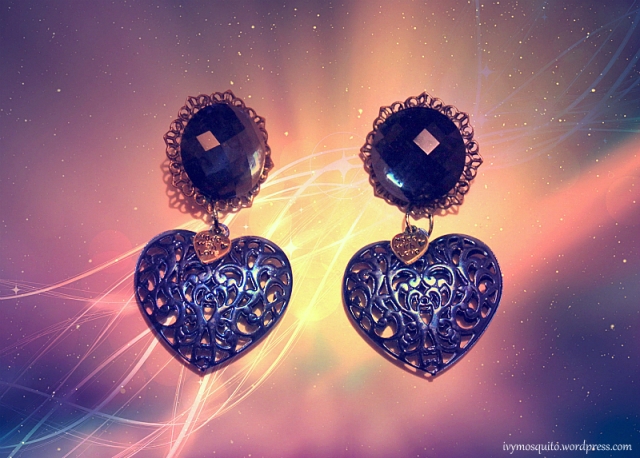
I made this earrings in my head first, I knew exactly how i wanted them to look like. Then in my luck, I have found awesome girl who helped me in finding all the specific parts, some of what she already had because she makes jewelry on her own. Beautiful jewelry if I can add. I think she ships only in Croatia but if you want to check her work out, go on this link: Le Chic.

Fotor120901322

I made this Christmas earrings – that’s how I call them – in about an hour, not calculating the time i thought I can add something with nail polishing the pendants… but that was a mistake. :mrgreen: Except for a strong glue (I use glue for wood) I didn’t need really nothing else. I removed the hooks from earrings I will not use and glue zircons on the metallic/silver base. I put the big heart and small heart as a pendants – I made sure that will be possible when I was putting the zircons. The last step was to glue the hooks behind and voila! my Christmas earrings are done. I love them πŸ™‚

img_0005

What do you think? They will go perfectly with a sweater I bought which is blue and has big white heart from fake furΒ in the middle. It is hand-made and absolutely amazing. So, I’m going in the hand-made zone more and more, I ain’t even glancing behind… πŸ˜€

DIY: Autumn inspired cotton necklaces :)

DIY: Autumn inspired cotton necklaces :)

Hellooooo! πŸ™‚ I have made these two about a month ago, but just now got the time to feature them in the way I want (perfectionist hehe). As usual, I’m gonna let photos speak for themselves… And photos speak creative mess that is my reality when I get on my train of idea realisation. πŸ˜‰

Fotor0101913445

I have been kinda obsessed with brown and beige color this fall, I have bought one sweater and two shirt in brown color, beige bracelet and put out my brown clothes. I guess I’m trying to get close to Earth. πŸ™‚

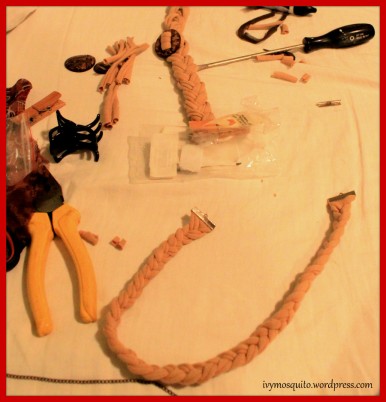
So, as you can see, I tried metal endings for my necklace for the first time… (I don’t know exactly how is it called, if you do feel free to comment.) I placed them with pincers and painted with nail polish in – guess what color? Brown. :mrgreen:

Fotor0101914157

I realised that when I do have idea of what I want to make it is rarely clear when it comest to jewelry. When it comes to everything else, I pretty much have it all planed out. But when I started making for example, second necklace, I have no idea where my thoughts will lead me. I know I wanted to include braids and wooden buttons I have in my “left-over” box. I deliberately put all the photos so you can see the progress. I wanted to braid the wooden buttons in at first, then only three, one as a central piece and two on each side, and then finally the way it turned out. So, yeah, it’s a process, when I see something isn’t going the way I imagined, I change the course. πŸ™‚

Fotor0101914833

Enjoy in your free time, and if you don’t have any – make it. Love ya!

p.s. I can’t wait to post denim update… πŸ˜€

DIY: Summer inspired cotton neclackes

DIY: Summer inspired cotton neclackes

Hello! As the summer (here) is coming to its end :(, I decided to share with you the necklaces I did from cotton in the past months.

I was inspired by summer/navy theme and had many ideas which all led into this three different necklaces. I got some old clothes (in good shape, just used) and by looking into colors of few of the shirts I immediately had an idea to combine dark blue – light blue – white, in different combinations.

It took some time of course from the original thoughts to the finished necklaces because that was my first attempt of making this type of necklace.

  • Β You know that I shared one of my necklace with you earlier, but these are actually made first πŸ˜‰

I needed some advice so I contacted very kind person who is making this sort of necklaces and ask her for advice. So the basic thing I can say about making cotton necklaces is: when you cut your stripes of fabric, grab the two ends of fabric and stretch them. Then start to spin them until you get this neat look. πŸ™‚ And also, use thin cotton. It’s better.

I don’t know how to explain what I did haha, because blog wasn’t in my plans at the time, so I didn’t take photos. The middle one was actually looking a lot different but then I made this braid instead of just stripes… The bow is made from a part of a shirt that had rubberΒ inside, and I sew it inside out. With the left one I got playful and tied a bunch of stripes on the middle as you can see. (That one is also my favorite to wear, psssst. πŸ˜‰ )

Anyway if you have any questions, please do ask… Comment, I’m always happy to hear your thoughts.

πŸ™‚

This slideshow requires JavaScript.

DIY bracelet with rivets

DIY bracelet with rivets

Increasing popularity of rivets in jewlery and clothing not necessarily connected to the metal/rock culture was the reason I started to look at rivets differently. I admit it. πŸ™‚ I’m not fashion addict and most certainly do not follow fashion rules for seasons, but I confess that fashion puts things in more appealing perspective to me which I wouldn’t think of otherwise.
But trends irritate me, it’s no fun to wear exactly the same thing as every other girl on the street, plus some of the trends are really ridiculous. So i guess my point of view on fashion and trends is – take what you like and make the most of it. Pretty much like with anything else in life. πŸ™‚
Inspiration for this bracelet came to me from desire to do something with rivets and need. I needed a thin bracelet. But an idea for realisation was set in my mind when I saw on Facebook beautiful, most elegant and extraordinary bracelets and jewerly from Zara Bijoux. Make sure to check them out. πŸ™‚ I will feature creative little hands at my blog in future (especialy jewelry makers), and you can bet Zara Bijoux will be among them. πŸ˜‰

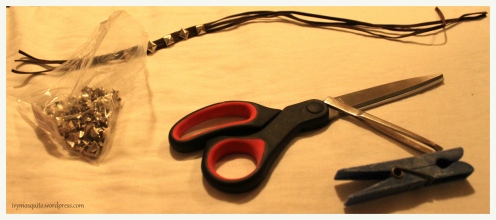
I had a leftover piece of thin leather strings bought for making another necklace year ago and I ordered rivets from e-Bay for cheap. I’m not sure how much did I pay for them but there’s a link of something like that.

You can see every step in the pictures. To be honest, I had no idea that this would turn out to be such pain in the *** πŸ˜€ It tested my patience because strings keep falling out and rivets were not in straight line. I re-did probably half of them ’till I got it the way i wanted.

Step no.2

Awesome fact: I didn’t know how will the bracelet end, how will I button it up. Yeah, now the word reveals it, but only in english. πŸ˜‰ I have a stash of buttons, not as much as I used to have, but I still save them when I buy something new. So, the small green one was my button of choice :D, and I kinda figured out in minutes how I’m gonna do the ends of a bracelet.

IMG_7379

And here it is. First, but not the last bracelet with rivets. πŸ™‚

that

The land of PINK

The land of PINK

This was a present for my friend who adores pink color. πŸ™‚

It is made from a belt that was on a shirt I bought in a secondhand outlet and it just didn’t fit (for me), so I cut it off and made theese two beauties instead. πŸ˜‰

I have photos of the process, but not as detailed as I could. This will be the case for probably everything I made up to this point… I’m gonna start making more step-by-step photos from now on, I promise.

First bracelet – with a buckle

I used an old buckle from a purse belt I never use and cut the leather to fit. Then I glued the part that needs to stay together and put a pyramid rivet through.

DSC_0175

I cut the soon-to-be-bracelet belt to the shape I wanted and sew the buckle on.

IMG_0177

I made sure the buckle was secure enough for wearing and.. that’s it πŸ™‚

IMG_0179

Second bracelet – with rivots

From what I had left from the belt I cut leather in square shape and put pyramid rivots in two rows, with a help of a ruler to keep the distance between rivots approximately the same.

IMG_0176

I wish I hade had taken photos of the next step, but I didn’t. 😦 So, I took some white rubber for fabric and paint it pink with a felt pen and then sew it onto both ends of the bracelet in the middle.

IMG_0180

I made sure that I cut the right amount of fabric rubber, and that was it. πŸ™‚

IMG_0182

Done and done.

Have a nice day! πŸ™‚

Breakin’ the ice

Fotor071721371 - Copy

It is complete! πŸ˜€ Finally…

I’m gonna describe what I did, step by step. I’ll put on some detailed pictures of exact process next time… Everyone who makes necklaces like this likes to do their cotton necklaces or jewelry on a maybe similar but still different way. I’ll explain mine in some of the next posts. πŸ™‚
So, by numbers here we go:

1. I got some cotton shirt (thick cotton this time), and cut it in about 3 cm widght.

2. As soon as I got this tranparent summer shirt/dress I knew it will became some sort of necklace (hehe), because the fabric is so nice and pattern is just beautiful.

3. For the brooch I had some difficult time figuring out how to cut the badge I had, eventually i used can opener, πŸ˜‰ and a safety pin.

4. Then I had to glue everything for brooch. Normally I put something heavy such as a book to keep it dry in place, but since in this case I couldn’t do that I used wooden clips.
p.s. I use all type of glue but in this area I used glue for wood – because big button in the center is wooden

5. Ta-daaa πŸ™‚ It is done, and ready. I imagined it in combinations with more classic clothes like work combinations. As you can see in the picture I put transparent fabric all around and tied it on top with cotton pieces left from the shirt i used. Brooch is from one wooden button and around is again the same cotton fabric braided and glued. On the centre of wooden button I glued some of the transparent fabric and then covered everything with nail polish. πŸ˜‰ I glued everything on the peace of cotton fabric which I sewed first in two layers to stand better and to be able to hold the entire piece.

Do you like it?